It is important to notify the team involved in a project about the failed test cases after the test execution. We can use Selenium to send an email with the test execution status and a screenshot of failed tests. In the case of Cypress, whenever a test fails, the method implemented here will send a notification to the recipient email along with the dashboard url.
1.Using Selenium Webdriver
Selenium WebDriver is one of the most popular automation tools for web applications today. It is useful for QA engineers to test web applications that run across multiple browsers. As an automation tester, it is our duty to test the application, find bugs, and report them to the development team and other team members. Hence, reporting is really important in the software testing process.
Reporting results-Implementation
1. Listeners
The most common usage of listeners occurs when taking a screenshot of a particular test that has failed. Listeners listen to the event defined in the Selenium script and behave accordingly. The TestNG Library provides an interface called ITestResult that describes the outcome of a test.
public void on TestFailure(ITestResult result) {
System.out.println("Method failed"+ result.getName());
}
public void on TestSkupped(ITestResult result) {
System.out.println("Method skipped"+ result.getName());
}
public void on TestStart(ITestResult result) {
System.out.println("Method started"+ result.getName());
}
public void on TestSuccess(ITestResult result) {
System.out.println("Method passed"+ result.getName());
}
result.getName will return the method name.
2. Screenshot function
If we want to take a screenshot on test failure, we can use the TakeScreenshot method from Selenium. Below is code that shows how to take a screenshot on test failure.
@AfterMethod
public void ScreenShot(ITestResult result) throws MessagingException{
//using ITestResult.FAILURE is equals to result.getStatus then it enter into if condition
if(ITestResult.FAILURE==result.getStatus()){
(Your screenshot code goes here )
}
}
After every method, it executes the above code. It checks the test status. If the run status for the method is failed, then it invokes the screenshot code. By using the "Take Screenshot" method, we can capture a screenshot.
TakesScreenshot screenshot=(TakesScreenshot)driver;
File src= ((TakesScreenshot)driver).getScreenshotAs(OutputType.FILE);
// Copy files to specific location
FileHandler.copy(src,new File("filelocation"+result.getName()+".png"));
3. Sending Email notification
To send email notifications,we need some jar files.
- Add JavaMail API JAR file in your Selenium project. Click here to download the JAR file.
- Alternatively, you can create a maven dependency of JavaMail API. Click here to get the Maven dependency of JavaMail API.
Along with these jar files,we need to import these packages.
- import java.util.Properties;
- import javax.activation.*;
- import javax.mail.BodyPart;
- import javax.mail.Message;
- import javax.mail.MessagingException;
- import javax.mail.Multipart;
- import javax.mail.Session;
- import javax.mail.Transport;
- import javax.mail.internet.InternetAddress;
- import javax.mail.internet.MimeBodyPart;
- import javax.mail.internet.MimeMessage;
- import javax.mail.internet.MimeMultipart;
Specify the list of recipients who will receive the email notification, as well as the sender's email address and SMTP and host port numbers. Next, we set the SMTP hostname as the property, and we create a new session to implement the email service. After the session is set up, we create an instance of the MimeMessage() class and pass the instance of the session in the constructor. Further, we create the Internet addresses of the sender and recipients.
In the first message body, we define the subject of the email and the email’s body. In the second message body, we insert the screenshot as an attachment and finally combine these message bodies with the MultiPart class.
At last, use Transport to authenticate the session and perform login validation. Once it is authenticated, the user successfully sends the email to the team.
Complete code for sending mail with screenshot as attachment:
@AfterMethod
public void screenShot(ITestResult result) throws MessagingException{
if(ITestResult.FAILURE==result.getStatus()){
try{
// To create reference of TakesScreenshot
TakesScreenshot screenshot=(TakesScreenshot)driver;
// Call method to capture screenshot
// result.getName() will return name of test case so that screenshot name will be same as test case name
File src= ((TakesScreenshot)driver).getScreenshotAs(OutputType.FILE);
FileHandler.copy(src,new File(“filelocation”+result.getName()+”.png”));
System.out.println(“screenshot is captured”);
//Sending mail
String receipientTo = “TOMAIL”;
//Sender’s Mail id
String senderFrom = “FROMMAIL”;
String path=”LOCATION”+result.getName()+”.png”;
//Getting System properties
Properties prop = System.getProperties();
//Setting up smtp host
prop.setProperty(“mail.smtp.host”, “smtp.gmail.com”);
//Creating a new session for smtp
Session session = Session.getDefaultInstance(prop);
MimeMessage msg = new MimeMessage(session);
//Instance of From Internet address
InternetAddress frmAddress = new InternetAddress(senderFrom);
//Instance of To Internet address
InternetAddress toAddress = new InternetAddress(receipientTo);
//Setting up sender’s address
msg.setFrom(frmAddress);
//Setting up recipient’s address
msg.addRecipient(Message.RecipientType.TO, toAddress);
//Setting email’s subject
msg.setSubject(“Test Status Report”);
BodyPart msgBody = new MimeBodyPart();
//Setting email’s message body
msgBody.setText(“Failed tests with screenshot”);
//Instance of second part
Multipart multiPart = new MimeMultipart();
multiPart.addBodyPart(msgBody);
//Another mail body
msgBody = new MimeBodyPart();
//path of screenshot saved
DataSource source = new FileDataSource(path);
DataHandler dataHandler = new DataHandler(source);
msgBody.setDataHandler(dataHandler);
msgBody.setFileName(path);
multiPart.addBodyPart(msgBody);
msg.setContent(multiPart);
//Authentication and connection establishment to the sender’s mail
Transport transport = session.getTransport(“smtps”);
transport.connect(“smtp.gmail.com”,465,”FROMMAIL”,”PASSWORD”);
transport.sendMessage(msg, msg.getAllRecipients());
transport.close();
System.out.println(“Mail Sent”);
}catch (Exception e){
System.out.println(“Exception while taking screenshot “+e.getMessage());
}
}}}
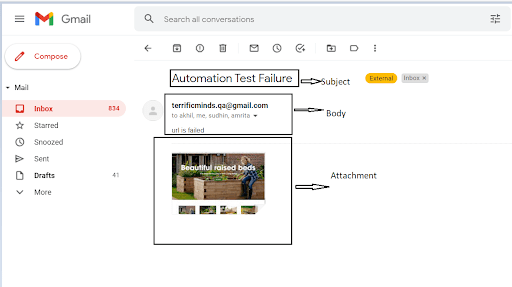
Result:
After a test fails, a notification mail with screenshot attached will be sent to recipient mail ids.
2. Using Cypress
Cypress is an open source, Javascript-based front-end test automation tool used by developers as well as QA engineers to test web applications developed in React.js, Angular.js, Node.js, Vue.js, and other front-end technologies. Cypress provides an email-results-plugin that sends an email when a test fails.
Reporting results-Implementation
1. Install Plugin
The plugin is an NPM module that can be installed as a dev dependency.
npm i -D cypress-email-results
We can use any email transport module for sending mail. Here, the nodemailer module has been used for sending mail.
Add the below code to plugin/index.js. This code is the mail sending module. It authenticates the sender's credentials.
const nodemailer = require(‘nodemailer’)
const transporter = nodemailer.createTransport({
host: ‘smtp.gmail.com’,
port: 465,
secure: true,
auth: {
user: ‘sender email’,
pass: ‘password’, },
logger: true});
var Options = {
from: ‘from email’,
to: ‘to email’,}
transporter.sendMail(Options, (error, info) => {
if (error) {
return console.log(error); }
console.log(‘Message sent: %s’, info.messageId);})
;
Add the below code to plugin/index.js. This code invokes the email results plugin, and recipients’ mail is specified. If EmailOnSuccess is set to false, no notification is sent when the test fails
require(‘cypress-email-results’)(on, config, {
email: [’email1,email2,email3′],
emailOnSuccess: true,
transporter })} //pass your transporter object
To get the dashboard url in mail,instead of npx cypress run,you can run command
npx cypress run –record –key <your record key>
Result:
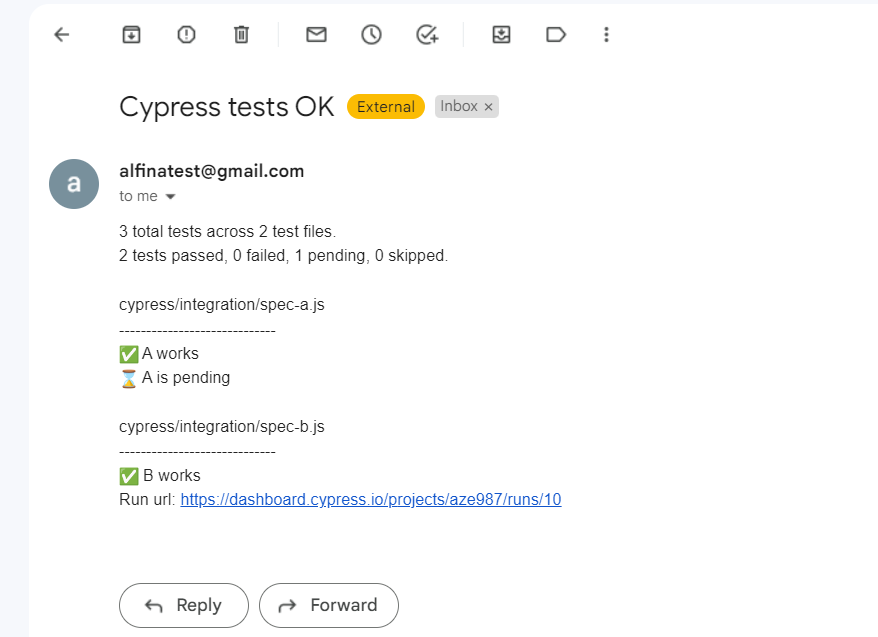
After a test run, a notification mail with dashboard url will be sent to recipient mail ids.
Conclusion
Regarding the method explained under Selenium, whenever a test fails, it will send a notification to the recipient email specified in the mail function along with a screenshot of the webpage where the test failed. After implementing the method explained under Cypress, whenever a test fails or passes (as required), it will send a notification to the recipient email specified along with the dashboard url.
These methods will alert the team about the status of their test execution. Therefore, the team gets notified about the status of execution. This method is especially useful for regression testing, where QA is notified whether any deployment affects the existing code because it automatically notifies them in case of failure without manual testing.